How to Import Online Tests between your Accounts
Tue 5th Apr 2016< Back to Blogs and Tutorials
Many times, organizations prefer separate accounts, privacy reasons between separate departments is a common example. With ClassMarker, you can create and share online tests between accounts, while keeping them private to only those who you give access to.We have created this guide to show you how you can export the tests you have created in one account and import them directly into another account.
The first thing to consider is categories. Does the test you are exporting have questions that have been categorized? If so, you will then want to decide if you want the questions on the test to automatically go into the same categories when importing these into the new account or not.
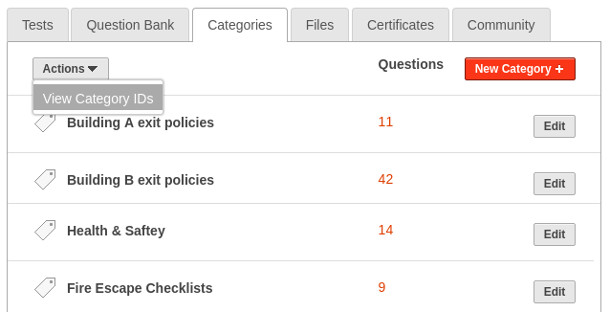
When creating question categories, each category is given a unique ID, which you can see from your Categories page by hovering your mouse over the 'Actions' tab and clicking on 'View Category ID's'.
Now, let's go over the steps on how to export and import into a new account.
Ensure that you have the category ID's from your existing account:
- In your existing account - from your Dashboard, choose 'Categories'.
- On your Categories page, hover your mouse over the 'Actions' tab button, located top left of categories - this will show you all of the category names and ID's for each category. You will need these for adding the same categories in the correct order in the new account.
Add the same categories into your new account:
- In your new account - from your Dashboard, choose 'Categories'.
- Begin creating the same categories in the same order (creating categories is very easy. Simply click on the red 'New Category' button, give the category a name and click 'Submit')
Let's use this as an example as the category ID's you have from the existing account.
Example; If you see your category ID's as below:

In your new account, you would create these same categories in the same ID order so they match exactly.
So, the first category is 'Building A exit policies', the second category is 'Building B exit policies' and so on. The ID numbers are the order that the categories were added. In the new account, you will create your first category as 'Building A exit policies', this will then give the category ID as 1, which is the same as in the existing account. Continue doing this for all categories.
Now that you have all of the same categories created in both accounts, it's time to do some exporting and importing of your test(s).
How to Export Test(s) from your existing account:
- Go to your Tests page and click on the required test to expand options.
- Click on 'Edit' (to the right of the test name). This will take you to your test 'edit' page that includes all of your questions.
- Hover your mouse over the grey 'Options' button and select 'Export Questions'. This will download all of this particular test's questions to a .txt file.
Please Note: You will need to use an advanced text editor such as Notepad ++. For Mac, you can use the default text editor and for Linux 'gedit'. Be sure, when saving your text file, that the file format is saved as "UTF-8" format.
Provide the file for the new account:
After you have completed exporting questions by test, you can now log out of the existing account and log into your new account in order to import your test. Or, if sending the file to another person for them to do the importing into another account, now is the time you would send this file. Importing the file is as easy as exporting the file was!
How to Import Test(s) into new account:
- In the new account - from your Dashboard, click on Question Bank.
- Hover your mouse over the red 'Manage Questions' button and select 'Import New'.
- Choose Step 2, as you do not need to create a new import template. You will then choose the file for uploading and click 'Upload files for checking'.
What does 'Upload files for checking' do?
This will upload your file and first give you the chance to review your questions to ensure everything looks correct before they are saved to the account. When your questions look good to go, you can choose an option to save your questions with.
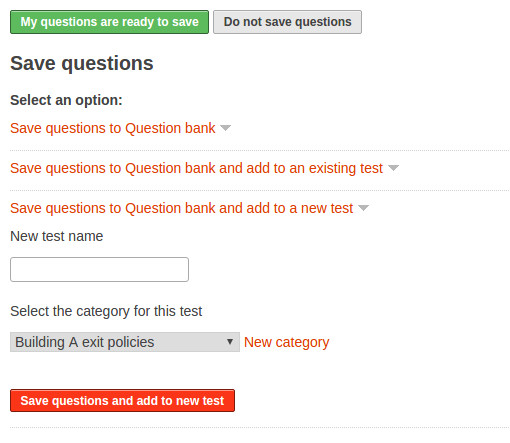
- Click on the option 'Save questions to Question Bank and add to a new test' Give your test a name and save it.
Your test is now in your new account ready to use.
When you import your questions by test, all of your questions will then automatically go into your Question Bank as well.
Importing exams with ClassMarker could not be any easier!
Hopefully this guide will help you to quickly and easily export and import your tests between accounts. If you do have any questions, you can of course always contact customer support. We are available 24 hours a day, 7 days a week and always happy to assist!
Happy Testing!
Register here and start creating online exams and quizzes today.
Review Related Online Testing Blogs and Tutorials
How can I integrate online tests on my website?
How to create custom certificates?
How to give exams in multiple languages?
How to Charge for your Quizzes And Exams Online?