
Restrict Quiz Attempts After Passing Exam
Sun 10th Feb 2019< Back to Blogs and Tutorials
When you set the number of attempts on a Test, there may be times you would like your users to use all of the attempts you allow or you may want to prevent quiz re-attempts after passing.
ClassMarker offers both of these options, when setting attempts.
All Attempts Taken:
If you set the number of attempts to 3 for example, and enable all attempts to be used, regardless if a user passes or fails, they can still take that Test to the number of attempts set.
PassMark Achieved:
If you have set a passmark and choose this option, once the user passes, they will have no further attempts. Those who fail would still be able to use their remaining attempts.
You can restrict the number of attempts after passing, when using Links to assign your Tests.
How to restrict users from taking additional attempts after passing:
Now, when users take your Test and pass, they will have no further attempts available to them. If they do not reach the passing mark, they will have the extra number of attempts available, until they pass or reach the attempts limit.
ClassMarker FYI: Under certain circumstances, you may need to give certain users additional attempts over what you have set for all test takers, however you do not want to change the attempts for everyone. No problem! With ClassMarker, you can simply create a new access code for that user to provide them with the ability for further attempts.
If at any time you need to change the ‘PassMark Achieved’ setting, you can do so and the changes will immediately take effect on that same Test link. No need to make a new Test link. All changes will be applied instantly!
Please Note: The same access list can be applied to multiple Test links. If you are using this Access List across multiple links, do not use the ‘Remove Code’ option. The reason being is, if you have a user for example; take the Test on Link A, this will then remove the access code from the access list, hence removing their code from all Test links that the same access list is applied to. Instead, create a separate access list per each Test link.
What is an Access List?
For those of you who have not yet experienced ClassMarker, you may be wondering what an Access List is. An access list is the best way to restrict quiz access and attempts for your Test. Not only will this ensure the absolute number of attempts set, but this will also ensure that only those users who have access codes can take that Test.
This means that you can add your Test link into a blog, website, email, social media site - anywhere you choose and you can be assured that although the Test link is placed online or even if one of your users were to share that Test link, nobody can gain entry to that Test unless you have provided them with an access code!
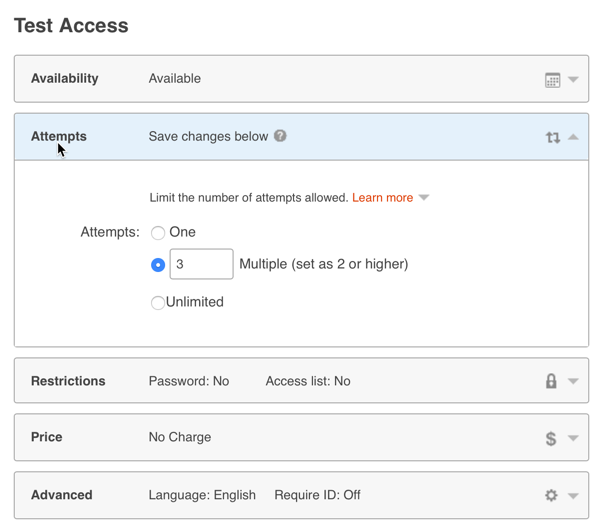
Where to Set the Number of Attempts?
After you have assigned your Test, go to your Tests Page, Under your Assigned Test, Select ’Settings’, then under 'Test Access', you will find the 'Attempts' setting. (Or see this setting when you first Assign your Test). You can set this from 1 to unlimited.
This is just one of the great features that has been recently added to the ClassMarker system. To check this feature out, along with ClassMarker’s other fantastic features, you can register for a free 30 day trial that includes all features we offer! All you need to do is click on the link below and provide your name and email and create a username and password and you’re ready to begin creating your Tests to prevent users from reattempting quizzes after passing.
FYI: We do not ask for any credit card details, where you live, what you like, what industry you are in, what your favorite food is, what kind of car you drive , or anything else! We believe in a simple and quick registration asking only what is needed, so you can get down to business…or education, depending on your Testing requirements!
Happy Testing!
Register Here to try ClassMarker today!
Review Related Online Testing Blogs and Tutorials
how Do I Set a Passing Grade on Quiz?
How Do I Assign a Quiz?
How Do I Create a Quiz?
How Do I View a Quiz Demo?
ClassMarker offers both of these options, when setting attempts.
All Attempts Taken:
If you set the number of attempts to 3 for example, and enable all attempts to be used, regardless if a user passes or fails, they can still take that Test to the number of attempts set.
PassMark Achieved:
If you have set a passmark and choose this option, once the user passes, they will have no further attempts. Those who fail would still be able to use their remaining attempts.
You can restrict the number of attempts after passing, when using Links to assign your Tests.
How to restrict users from taking additional attempts after passing:
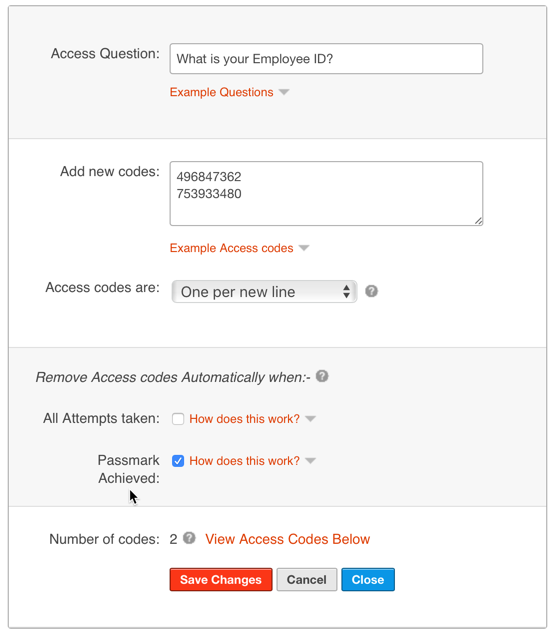
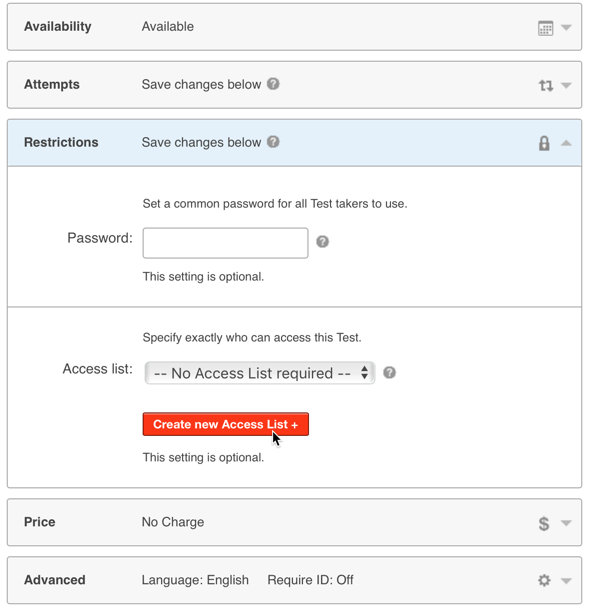
- On your Test ’settings’ page, click on Test Access > Restrictions
- Click on ‘Create New Access List’ (See below on What is an Access List?)
- Name the access list (this is for your reference only)
- Enter an Access Question. This can be ‘What is your email address?’, ‘What is your employee id?’ or anything you choose.
- Add Access Codes
- Select how access codes are separated from the drop-down (one per line, comma separated, semicolon separated, colon separated)
- In order to restrict attempts after passing, select ‘PassMark Achieved’ under ‘Remove Access Codes Automatically When'
- Save Changes
Now, when users take your Test and pass, they will have no further attempts available to them. If they do not reach the passing mark, they will have the extra number of attempts available, until they pass or reach the attempts limit.
ClassMarker FYI: Under certain circumstances, you may need to give certain users additional attempts over what you have set for all test takers, however you do not want to change the attempts for everyone. No problem! With ClassMarker, you can simply create a new access code for that user to provide them with the ability for further attempts.
If at any time you need to change the ‘PassMark Achieved’ setting, you can do so and the changes will immediately take effect on that same Test link. No need to make a new Test link. All changes will be applied instantly!
Please Note: The same access list can be applied to multiple Test links. If you are using this Access List across multiple links, do not use the ‘Remove Code’ option. The reason being is, if you have a user for example; take the Test on Link A, this will then remove the access code from the access list, hence removing their code from all Test links that the same access list is applied to. Instead, create a separate access list per each Test link.
What is an Access List?
For those of you who have not yet experienced ClassMarker, you may be wondering what an Access List is. An access list is the best way to restrict quiz access and attempts for your Test. Not only will this ensure the absolute number of attempts set, but this will also ensure that only those users who have access codes can take that Test.
This means that you can add your Test link into a blog, website, email, social media site - anywhere you choose and you can be assured that although the Test link is placed online or even if one of your users were to share that Test link, nobody can gain entry to that Test unless you have provided them with an access code!
Where to Set the Number of Attempts?
After you have assigned your Test, go to your Tests Page, Under your Assigned Test, Select ’Settings’, then under 'Test Access', you will find the 'Attempts' setting. (Or see this setting when you first Assign your Test). You can set this from 1 to unlimited.
This is just one of the great features that has been recently added to the ClassMarker system. To check this feature out, along with ClassMarker’s other fantastic features, you can register for a free 30 day trial that includes all features we offer! All you need to do is click on the link below and provide your name and email and create a username and password and you’re ready to begin creating your Tests to prevent users from reattempting quizzes after passing.
FYI: We do not ask for any credit card details, where you live, what you like, what industry you are in, what your favorite food is, what kind of car you drive , or anything else! We believe in a simple and quick registration asking only what is needed, so you can get down to business…or education, depending on your Testing requirements!
Happy Testing!
Register Here to try ClassMarker today!
Review Related Online Testing Blogs and Tutorials
how Do I Set a Passing Grade on Quiz?
How Do I Assign a Quiz?
How Do I Create a Quiz?
How Do I View a Quiz Demo?